Finally let’s see how you can connect to IPv6 using tunnel broker (in this certain case we are going to use tunnelbroker.net).
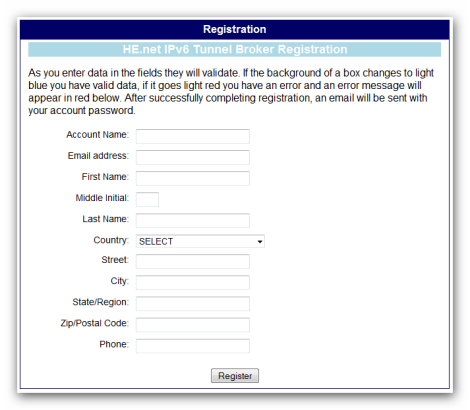
1) Registration at tunnelbroker.net
The registration and usage of given service are absolutely free. To create an account just enter your data and click “Register” button at this page. The password will be automatically generated and sent to your email address.
2) Creating a tunnel
As soon as the account is registered you need to create a tunnel. Here are the things you need to do:
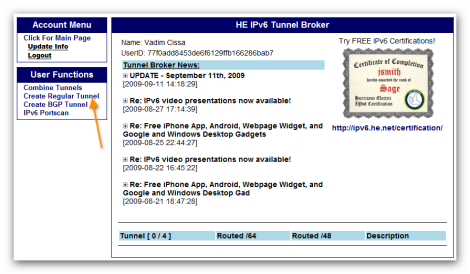
- Enter your account using your login and password
- Choose in the left menu: User Functions – Create Regular Tunnel

- Enter your current IPv4-address or the address of your provider, if you are connected via NAT (it’s very important that you or your provider don’t have incoming packets ICMP blocked):

- Click “Submit” button
3) Configuration of your computer
After creating a tunnel you should do:
Account Menu – Click For Main Page – Choose the Tunnel (click on the link) .
At the very bottom of the page you will find Example OS Configurations (Windows, Linux, etc.) field. Choose the one you need and press “Show Config” button:
As you can see the code is given. There is no need to change something. Just copy and paste it to command line. IPv6 should work now!
4) Checking if IPv6 works
To check the tunnel you created just ping IPv6-version of Google. You can use ping6 ipv6.google.com command we mentioned before or just try to open ipv6.google.com in your browser.
5) Configure tunnel to autorun
In case everything works fine, the only thing you need to do is to make your tunnel autorun each time you connect to the Internet. This can be done in different ways depending of the operating system and type of connection you have.
In our case it’s Ubuntu and connection using PPPoE protocol. We added two files to the system (made both of them executable):
- /etc/ppp/ip-up.d/rm-ipv6-up
- /etc/ppp/ip-down.d/rm-ipv6-down
In the second file (and in the very beginning of the first one) we add command of tunnel deletion:
ip tunnel del he-ipv6
In the first file in addition to previous command you need to copy the lines for configuration you got from broker’s website.
6) Configure the IP-address auto-update of your tunnel
Due to the fact that in tunnel settings at broker’s site your IPv4 must be written, you need to update that information in case your IP-address is changed. To do so you need to get such an URL:
http://ipv4.tunnelbroker.net/ipv4_end.php?ipv4b=AUTO&pass=<MD5 of password>&user_id=<user ID>&tunnel_id=<tunnel ID>
In GNU/Linux you need to use curl command:
curl -4 -k --retry 10 --retry-delay 5 "http://ipv4.tunnelbroker.net/ipv4_end.php?ipv4b=AUTO&pass=&user_id=&tunnel_id="
Here are the parameters you need to specify in this URL:
- Password’s MD5 you can get by running echo -n <password> | md5sum in the command line
- User ID (this is not your login!) can be found on your page at broker’s site and represents long sequence of digits and letters.
- Tunnel ID is mentioned on the tunnel settings page, “Global Tunnel ID” field.
Conclusion
Most likely after reading this post you clearly understand all the advantages of IPv6 and the fact that it’s extremely easy to install on Linux. No doubt its worldwide deployment will take time, but it doesn’t mean that we should wait so long, does it? So don’t waste your time, just try it now to see the difference.
